Often in software development we need to access other resources, be it database server, blob storage or something else. This naturally requires authentication, which usually involves a client secret, a password or a certificate. But managing secrets and certificates properly is hard and mistakes could lead into catastrophic situation.
But there’s another way! Azure and many of its resources can be used without secrets. In this blog I’ll tell you how to login to Azure CLI in GitHub Actions workflow without secrets. The focus of this post is on providing an example and less on the explanation part, however, that can’t be completely avoided.
Before we get into the actual content it’s good to make a distinction here; when I talk about secrets, I mean passwords, client secrets and certificates. Not subscription IDs, application IDs, database server addresses or such. Though we usually keep database server addresses etc. safe, they themselves shouldn’t provide malicious user access to the resource without a secret. So, we still need database server addresses etc. to identify target resources, but we can get rid of passwords and client secrets.
Before getting started
Azure CLI login in workflow run without secrets is done quite similarly as with secrets; app registration and service principal are needed but a token is passed instead of a client secret.
The token is a regular JSON Web Token (JWT), where subject (sub) claim plays key role. Azure will only accept the token if issuer, subject and audience values match. However, the subject claim value is the only one that might change when using GitHub Actions. Depending on what triggered the workflow and whether an environment is referenced, GitHub issues token with different subjects. Different scenarios are described here. In this post I’ve referenced Development environment in GitHub Actions workflow, so I need to configure the subject accordingly.
1. Create app registration and assign roles
This can be done in different ways, for example, in Azure Portal by using Azure CLI. But I’ve prepared a bash script that will do all of the steps listed below. The script can be found further down. You just need to set the SUBJECT value. Also, you should check whether APP_NAME, ROLE and SCOPE make sense in your scenario. You might want to limit the scope to a resource group, for example.
- Create an app registration with some name, which represents your CI/CD pipeline in this case. Leave other settings default.
- Create a service principal for the app registration (if you create app registration in Azure Portal or Entra admin center, this is done for you automatically). Service principal is required because role assignments can only be assigned to identities and app registration doesn’t have an identity. Service principal acts an identity for the app registration.
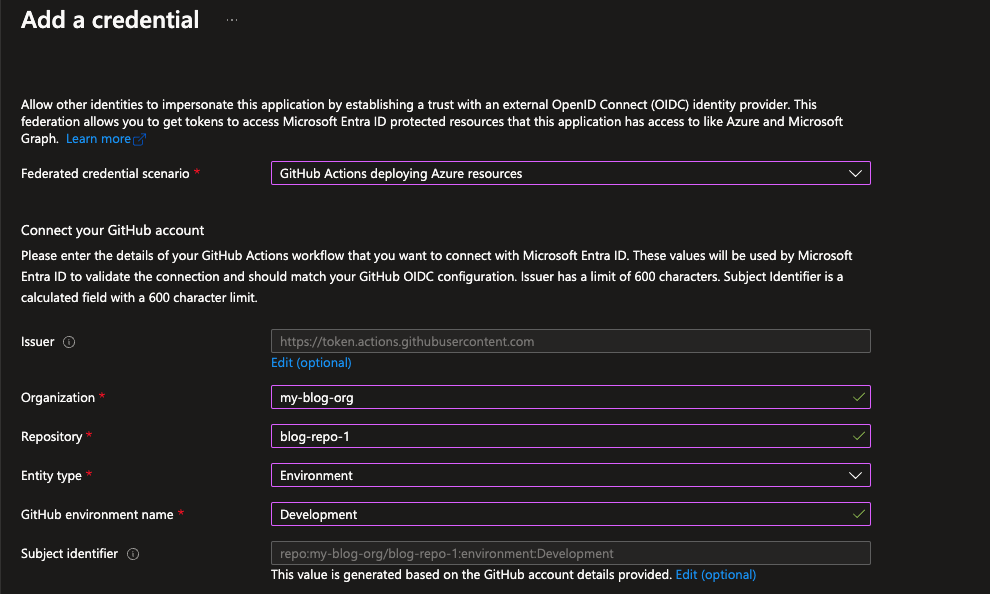
- Configure Federated credentials for the app registration. You can find Federated credentials tab next to Certificates and Client secrets tabs when you open the app registration.
- Assign role(s) to service principal. If you’re unsure, Contributor role is a good starting point.
Script requirements:
- Azure CLI needs to be installed
- You’re logged in to Azure CLI
- You have rights to create app registrations (you have e.g. Application Developer Entra role)
- You have rights to assign Azure roles (you have e.g. Role Based Access Control Administrator Azure role)
- jq needs to be installed (for handling JSON)
#!/usr/bin/env bash

# CONFIGURATION
# Use currently active subscription or you can set the subscription ID here manually
SUBSCRIPTION_ID=$(az account show --query "id" --output tsv)

# Change this
SUBJECT=repo:my-org/my-repo:environment:Development

# Check whether these make sense in your scenario
APP_NAME=github-actions
ROLE=Contributor
SCOPE=/subscriptions/$SUBSCRIPTION_ID

# ACTUAL SCRIPT
# Create app registration
APPLICATION_ID=$(az ad app create --display-name $APP_NAME --query "appId" --output tsv)

# Create service principal for the app
OBJECT_ID=$(az ad sp create --id $APPLICATION_ID --query "id" --output tsv)

# Prepare federated identity request object
# jq will create a JSON like this: {"name":"github-actions","issuer":"https://token.actions.githubusercontent.com","subject":"repo:my-org/my-repo:environment:Development","audiences":["api://AzureADTokenExchange"]}
FEDERATED_CREDENTIAL=$(jq --null-input \
    --compact-output \
    --arg name $APP_NAME \
    --arg issuer "https://token.actions.githubusercontent.com" \
    --arg subject $SUBJECT \
    --arg audience "api://AzureADTokenExchange" \
    '{"name":$name,"issuer":$issuer,"subject":$subject,"audiences":[$audience]}')

# Create federated identity
az ad app federated-credential create --id $APPLICATION_ID --parameters $FEDERATED_CREDENTIAL

# Assign role
az role assignment create --role $ROLE --assignee-object-id $OBJECT_ID --assignee-principal-type "ServicePrincipal" --scope $SCOPE

# Print relevant values
echo TenantID $(az account show --query "tenantId" --output tsv)
echo SubscriptiontID $SUBSCRIPTION_ID
echo ApplicationtID $APPLICATION_ID
2. Set GitHub Actions (non-)secrets
I know I said we’re getting rid of secrets, but let’s keep subscription IDs etc. safe anyway.
- Find tenant ID, subscription ID and client ID (application ID) values. You can find the values in the last three lines printed by the script.
- Store those values as GitHub Actions secrets with names AZURE_TENANT_ID, AZURE_SUBSCRIPTION_ID and AZURE_CLIENT_ID.
3. Configure GitHub Actions workflow
Here we’re going to use Azure Login Action. After the login step you can use az commands or other actions which require Azure CLI login, like Deploy ARM Template or Deploy Azure Web App.
Important parts here are:
- Permissions: id-token needs write permission, otherwise you won’t be able to request the JWT. Permissions can also be assigned on workflow level if you need them on multiple jobs.
- Add azure/login@v1 step
- Set the environment if you configured the federated credential subject to contain it.
...

jobs:
  login:
    runs-on: ubuntu-latest
    environment:
      name: Development
    permissions:
      id-token: write
    steps:
      - name: Login
        uses: azure/login@v1
        with:
          client-id: ${{ secrets.AZURE_CLIENT_ID }}
          tenant-id: ${{ secrets.AZURE_TENANT_ID }}
          subscription-id: ${{ secrets.AZURE_SUBSCRIPTION_ID }}
      - name: Show current account
        run: az account show
And that’s it.
Tip
Entra admin center and Azure Portal both have nice tool for forming subjects based on given parameter values. You can use that to make sure you get the subject in the right format.
It’s not just Azure and GitHub
GitHub also has well documented examples (e.g. AWS and GCP) of using OIDC in other services as well, not just Azure. And even better, you can fetch the JWT manually, enabling you to use it on any service because you’re not limited to GitHub Actions available in the marketplace.
And turning this the other way around, you can also do this in, for example, GitLab. It provides similar mechanism for fetching JWT for OIDC authentication.
What’s next
When using Azure, you can also get rid of many other secrets as well. You can for example authenticate to Azure Blob Storage or Cosmos DB without secrets using managed identities and role-based access control. More on that in part 2.