Storybook is a tool for frontend development that allows you to provide interactive examples of your UI components in an easy-to-browse interface. Storybook can be used with React, Vue, Svelte, Angular, Web Components, plain HTML, and other frontend frameworks/libraries. For a new project, I now consider it a must-have tool. It simplifies development by providing a clear view of the UI components in the project and their usage. It also allows you to quickly develop new components or even views without having to consider how to integrate them into the actual application and constantly navigate to them during the development. Instead, you simply create a new story for your component, open it in Storybook, and develop your component. Once ready, you can integrate it into the actual code.
All of that is enough itself to make Storybook a must-have tool, but did you know it can also be used for testing? Storybook developers have created a service called Chromatic for visual testing. It offers a lot of features such as automatic testing in multiple browsers, but as a SaaS product, it may not be possible to use it in all projects or it might feel like an overkill. In this blog post, I will introduce another option, Storybook Test Runner. With it, all your stories turn automatically into tests. And with a little bit of setup, they also turn into visual tests.
Storybook Test Runner
Storybook Test Runner, as their documentation says, turns all of your stories into executable tests. Behind the scenes, it uses Jest as a test runner and Playwright as the environment where the tests are executed. The setup is straightforward, assuming you are already using Storybook.
Install Storybook Test Runner with the command
npm install @storybook/test-runner --save-dev
and add it to your npm scripts in package.json:
{
  "scripts": {
    "test-storybook": "test-storybook"
  }
}
After this, start your Storybook as usual and run npm run test-storybook. It should now run your stories as tests.
Essentially, the test runner renders your stories, and if any errors or exceptions occur, the test fails. If the story
renders without any problems, the test passes.
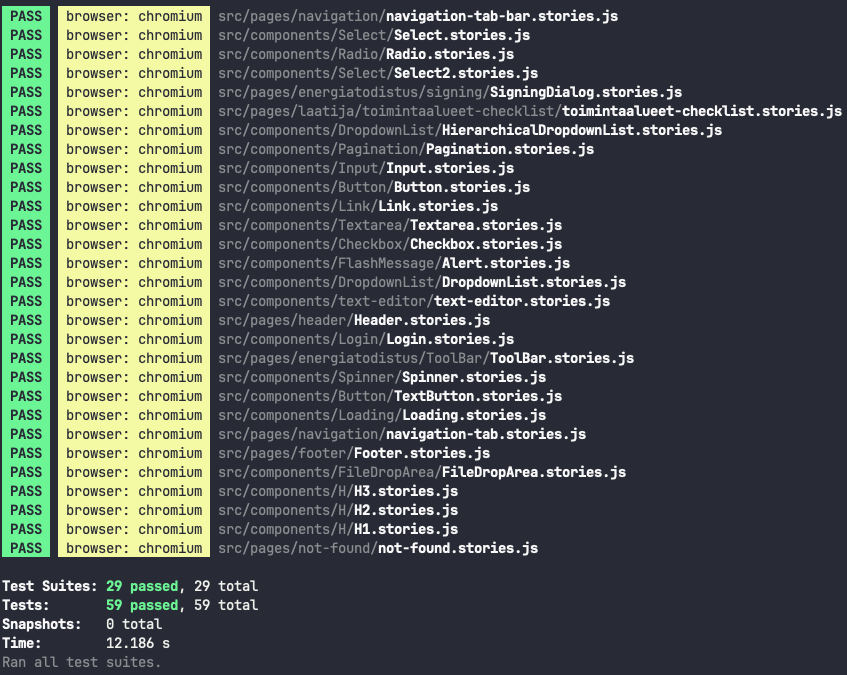
The output looks like normal Jest test output:
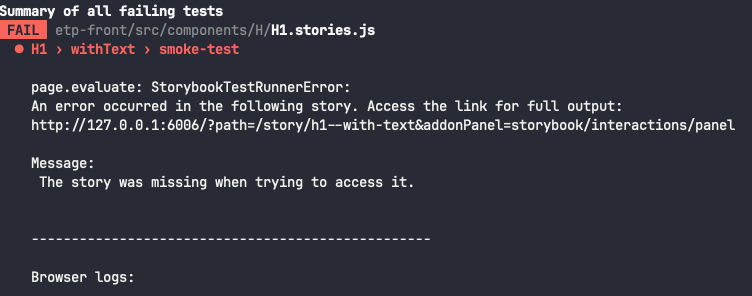
If a story has some errors in it, the output shows that a test called smokeTest related to the story failed:
This is easy enough to add to your project already using Storybook that unless your project already has a high test coverage for your component code, I think it’s worth adding to your project and CI/CD pipelines.
Turning the tests into visual tests
Now that your stories have turned into tests that ensure your components at least render without errors, it’s time to turn them into visual tests. Visual tests mean here tests that ensure your components have not visually changed. In practice, this means that for every story in your project, Storybook Test Runner takes an image snapshot that needs to be committed to your repository. While running the tests, Storybook Test Runner then takes a new image snapshot and compares it to the existing one. Test passes if the images are the same (or close enough to each other, based on configuration) and fails if they differ. If the change was intentional, you run the test script with an update flag and it overwrites the existing image snapshot in the repository.
The extra configuration needed for this can be found in the GitHub repository of Storybook Test Runner:
// .storybook/test-runner.ts (or .js)
import { TestRunnerConfig, waitForPageReady } from '@storybook/test-runner';
import { toMatchImageSnapshot } from 'jest-image-snapshot';

const customSnapshotsDir = `${process.cwd()}/__snapshots__`;

const config: TestRunnerConfig = {
  setup() {
    expect.extend({ toMatchImageSnapshot });
  },
  async postVisit(page, context) {
    // use the test-runner utility to wait for fonts to load, etc.
    await waitForPageReady(page);

    // If you want to take screenshot of multiple browsers, use
    // page.context().browser().browserType().name() to get the browser name to prefix the file name
    const image = await page.screenshot();
    expect(image).toMatchImageSnapshot({
      customSnapshotsDir,
      customSnapshotIdentifier: context.id,
    });
  },
};
export default config;
The snapshot functionality uses jest-image-snapshot, a Jest matcher that performs image comparisons using pixel
matching. To use this, you need to install it with npm i jest-image-snapshot --save-dev.
With the first run, the test runner generates the image snapshots under __snapshots__ directory. The snapshots are
screenshots of the stories taken from the Storybook page.

When your code changes in a way that affects how the component looks visually, your test will now fail. As an output of
a failed test, you will get a file named with your story under __snapshots/__diff_output__. This file has a
representation of the failure: On one side how the story used to look, on the other side how it looks now, and in the
middle a diff output of the two.

If the test fails, you need to determine whether the change was intentional. If it was not intentional, then you need to
fix the problem. If the change was intentional, you need to update the snapshot to match the new look of the component
or story. This can be done by running storybook-test runner again with an update
flag: test-storybook --updateSnapshot.
You probably should add that as an npm script to your package json as follows:
"test-storybook:update": "test-storybook --updateSnapshot"
After updating the snapshots, you just commit the changes.
CI, Operating Systems, Browser Versions, and All the Other Ugly Stuff
If this sounded simple and easy, fear not, it’s starting to get complicated. The setup we have now works on your computer. When you commit your snapshots and another developer or CI system then runs the tests, they will likely fail. This is the stuff the Storybook Test Runner image snapshot documentation fails to mention.
It’s logical if you think about it for a minute: Different operating systems and even browser versions render native HTML elements like buttons, selects, etc., and fonts differently. This means that image snapshots created on macOS are bound to differ from those created on Linux or Windows and vice versa.
To make them always match no matter who or what runs the tests, we can run the tests in Docker. As the tests are run in Playwright, the logical base image for this purpose is the ready-made Playwright image from Microsoft which contains all the browsers needed. To make it easier to use Storybook Test Runner inside a container, it’s best to create some bash scripts.
First, let’s create a script that handles building the Docker image, creating the container, running the tests inside the container, copying the test results out of the container and finally getting rid of the container.
run-visual-tests-in-docker.sh:
#!/usr/bin/env bash
set -u

if [ "${1:-}" == 'update' ]
then
  update=true
else
  update=false
fi

docker build -t -visual-tests -f visual-tests.Dockerfile .

# Run the visual tests inside a container, pass the flag whether to update image snapshots or not
docker run --name -visual-tests-container -visual-tests ./run-visual-tests.sh "$update"
status=$?

# Delete previous diffs
rm -rf __snapshots__/__diff_output__

# Copy the results to local machine from the container
docker cp -visual-tests-container:/visual-tests/__snapshots__ .

docker rm -visual-tests-container

# Exit with the code returned by the test runner in the container
exit $status
visual-tests.Dockerfile for this purpose can look like this:
FROM mcr.microsoft.com/playwright:v1.43.1-jammy

WORKDIR /visual-tests

COPY package-lock.json ./
COPY package.json ./

RUN npm ci

COPY ./ ./
RUN npm run storybook:build
When building the image, we copy our project contents to it and build the storybook. Then we can use docker run to run the tests inside a container using the image. To make things easier with copying things in and out of the container, you should probably create bash scripts to run the tests.
Finally, the last piece is run-visual-tests.sh which is executed in the Docker container:
#!/usr/bin/env bash
set -euxo pipefail

if [ "$1" == true ]
then
  test_command="npm run test-storybook:update"
else
  test_command="npm run test-storybook"
fi

npx concurrently -k -s first -n "SB,TEST" -c "magenta,blue" \
            "npx http-server storybook-static --port 6006 --silent" \
            "npx wait-on http://127.0.0.1:6006 && $test_command"
This script starts a webserver to serve the previously built storybook and then runs the test command to execute the
test. run-visual-tests-in-docker.sh takes the optional parameter update which is passed all the way here to this
script. Without this parameter, the script only runs the tests. With the parameter, the snapshots are updated. Test
results diffs and updated snapshots are then copied to the host machine after the execution.
Now, running the tests with ./run-visual-tests-in-docker.sh will produce the same output regardless of the operating
system on the developer’s computer. This ensures that your new Storybook-based visual tests pass (or fail) as expected
in the CI environment.
In conclusion, Storybook is not only a powerful tool for developing and documenting UI components but can also be used as a visual testing tool. With Storybook Test Runner and jest-image-snapshot, we can automate visual testing and reduce the risk of visual regressions. While the initial setup with Docker might seem complex, the benefits of automated visual tests in CI outweigh the setup costs once it’s up and running.