Azure DevOps used to have only graphical build pipelines, known as Classic Pipeline GUI, which were edited only in the web portal. In Build 2019 Microsoft released pipeline as code, where pipelines are defined with YAML (aka YAML pipeline).
With YAML pipelines, it is possible to save pipelines to the version control. This is a big shortage of classic pipelines which are stored only somewhere in Azure DevOps (not in any files). An important rule “keep everything in version control” can be achieved with YAML pipelines, and it is more developer-like to have pipelines as code.
In this blog post, I will go through the basics of YAML pipelines and compare them with the classic pipelines.
Azure DevOps
Azure DevOps is Microsoft’s development, CI/CD, agile, artifact repository, and testing system; “swiss knife” for doing things. It has the following features:
- Wiki to document things,
- Boards for agile and scrum teams,
- Repos to save source code and do pull requests,
- Pipelines for continuous integration, delivery, and deployment,
- Test Plans, to run tests and
- Artifacts to save various kinds of packages (NuGet, NPM, etc.).
Practically it includes most of the things a software team needs except infrastructure to where to run the software. Its strength is the smooth integration with all of these features. For example, we can access source code repo from build pipelines, and run build automatically when there is a new commit. Or we can mark tasks on the board as done when its code is deployed via release pipeline.
Even if Azure DevOps is Microsoft’s product, it can be used with “not Microsoft” programming languages and make deployments to AWS or GCP along with Azure, or on-premises. You can use it even if you’re not using Microsoft’s products.
In this blog post, we will concentrate on pipelines; as code!
The example code
We will use a very simple “Hello API”. It will have one API method that will return a greeting like “Hello Lassi!”. Here is the C# code:
[Route("api/[controller]")]
[ApiController]
public class HelloController : ControllerBase
{
    public string SayHelloTo(string name)
    {
        return $"Hello {name}!";
    }
}
When we call GET https://localhost/api/hello?name=Lassi it will return “Hello Lassi!”.
YAML Pipeline
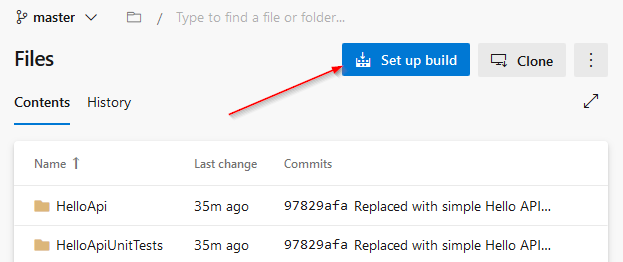
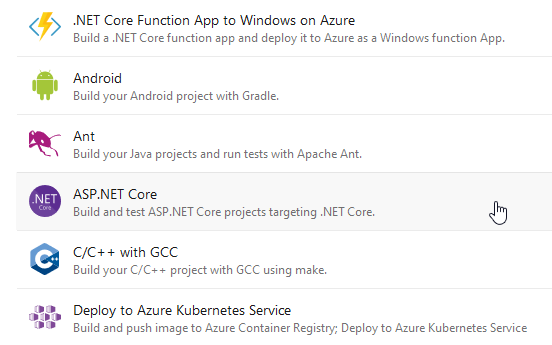
It is easiest to begin if our code is in Azure (DevOps) repo, so I’ve put them there. When we navigate to the repo in a browser, we just need to push the “Set up build” button and choose our base configuration. We will choose “ASP.Net Core”.
Now we have our initial YAML build pipeline (ie. pipeline as code) in front of us.
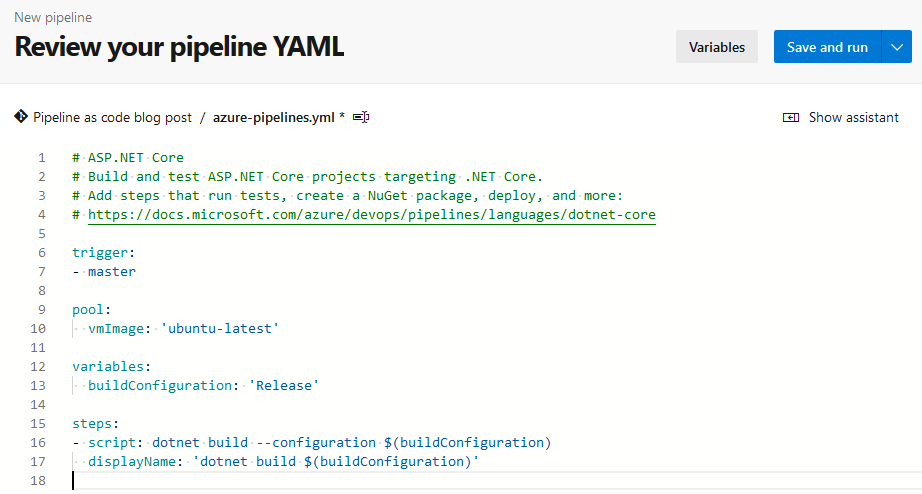
I will explain the key things in this initial pipeline.
- Trigger (line 6) will tell that this pipeline will run when there is a new commit in the master branch.
- Pool (line 9) defines which server this build will be run on. There are a few different servers that Microsoft gives out of the box. Here we’ll use Ubuntu to run builds (it is not mandatory to use Windows to run builds, Linux can be used also).
- In variables (line 12) we can define our variables.
- The core is in steps (line 15) where the actual build process is defined. At first, we will just run the
dotnet buildcommand which will compile our code.
Let’s push “Save and run” from the upper right corner and run our build for the very first time:
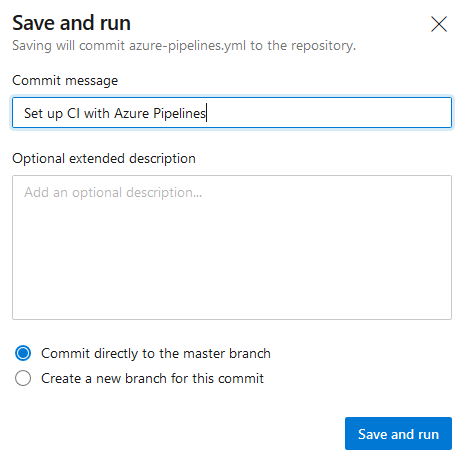
It will prompt us for a commit message because it is a YAML pipeline, and we have created a new file to be added to the repo. We will commit it to the master branch for simplicity. Here we are doing this in browser but naturally, we could use any text/code editor to edit our pipeline. Let’s run our very first build:
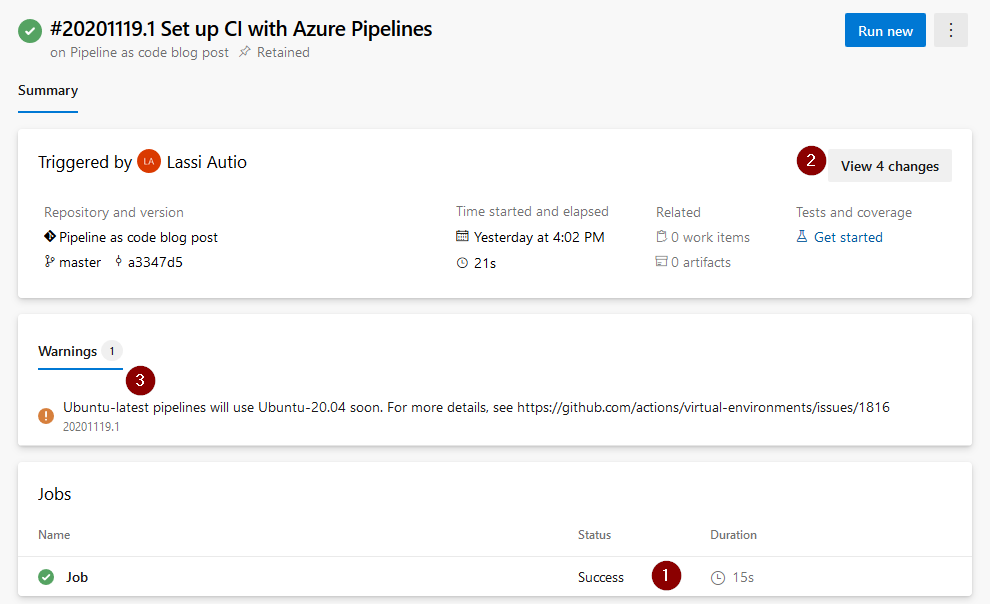
We can see that build was successful and took 15 seconds to run (1). If we want to, we can even see all commits that were run in this build before the previous build (2). There is one warning (3) that warns that even if now this was run with Ubuntu-18.04, in near future this will be run with newer Ubuntu-20.04. If this is important to us, we could change the pipeline code from “ubuntu-latest” to “ubuntu-18.04”.
Use the Azure DevOps Web Portal to Change the YAML Pipeline
Info
You don’t have to remember the syntax of Azure pipelines because IntelliSense will help and there is also UI in the Azure DevOps web portal that will help us with the syntax. These will help you to switch from classic pipelines to YAML pipeline.
Next, we will improve our pipeline: run unit tests.
We have two MSTest unit tests in our code:
[TestClass]
public class HelloControllerUnitTests
{
    [TestMethod]
    public void SayHelloTo_returns_valid_greeting()
    {
        var sut = new HelloController();
        Assert.AreEqual("Hello Lassi!", sut.SayHelloTo("Lassi"));
    }

    [TestMethod]
    public void SayHelloTo_returns_valid_greeting_for_another_name()
    {
        var sut = new HelloController();
        Assert.AreEqual("Hello Autio!", sut.SayHelloTo("Autio"));
    }
}
We will use the Azure DevOps web portal to add running unit tests into our YAML pipeline. When we go to edit the pipeline, we can see there are a lot of tasks on the right-hand side. We will choose the .NET Core.

This will show us a dialog from where we can choose the settings we want. This is a very nice feature because at least I can’t remember all settings for every task I’m using, nevertheless for the tasks I haven’t even used yet.
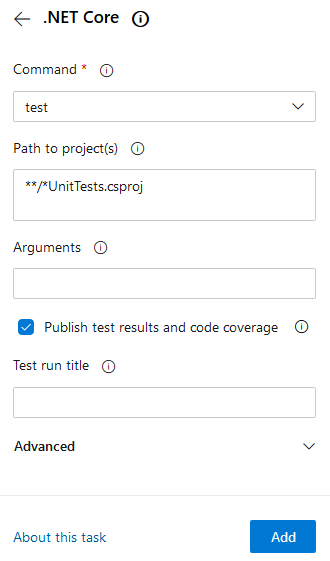
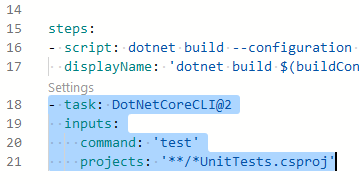
Here we have defined that we want to run tests from all *UnitTests.csproj files. When we click the Add button, the new task will be inserted into our code (lines 18-21).
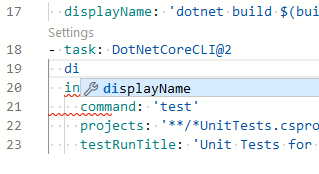
Now, if we want to make some change, we can do it easier straight to the YAML pipeline. But what if we want to change a setting that doesn’t appear in the YAML pipeline and we don’t know the syntax? Luckily there is a settings link that will open the previous dialog again and we can make changes also from there.
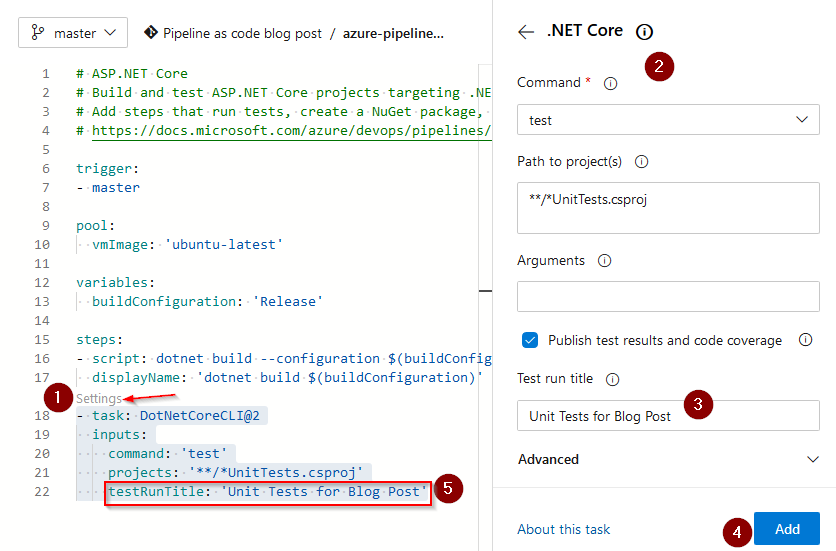
- Click settings on the task you want to make a change.
- Task dialog will open.
- Make a change (here add test run title)
- Press the Add button
- The change will appear in the YAML pipeline
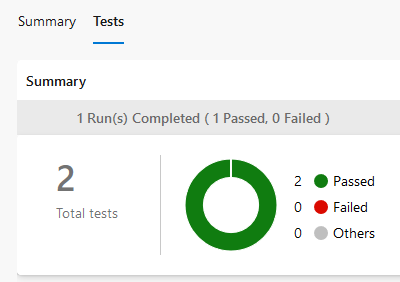
Now when we save changes and run the pipeline, we can see that there is a Tests tab and we can see from there that two tests have passed successfully.
The web portal has also IntelliSense that helps if we make changes to the YAML pipeline directly.
Use Visual Studio Code to Change the YAML Pipeline
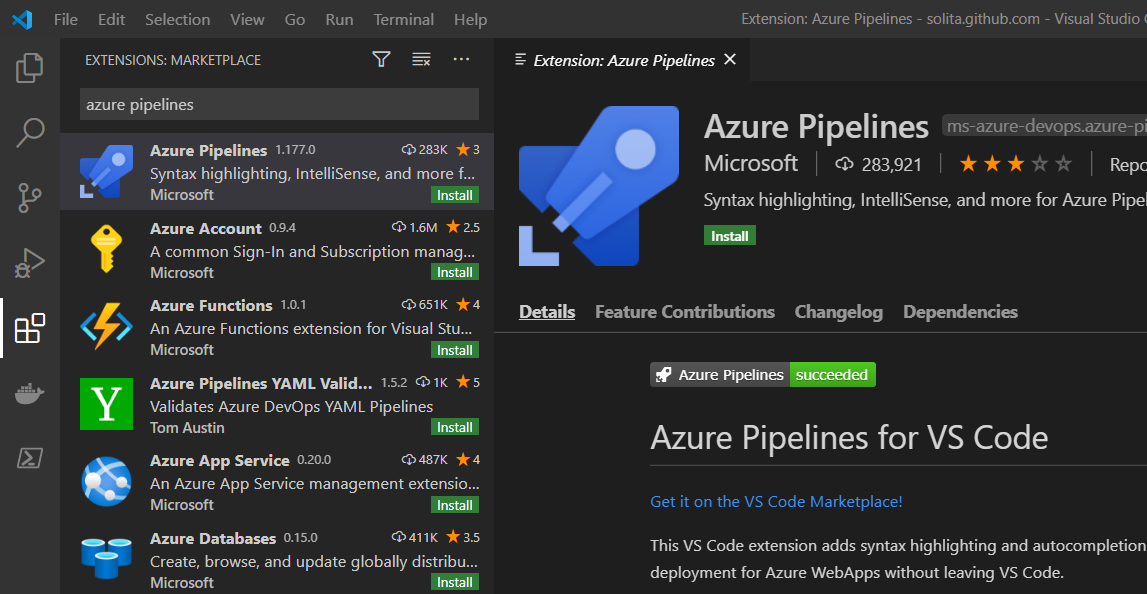
Using the web portal is an easy but not so developer-like thing. Because the YAML pipeline is in a plain text file, it can be edited with any text/code editor. Fortunately, there is an extension for Visual Studio Code by Microsoft, which will help to edit YAML pipelines with it.
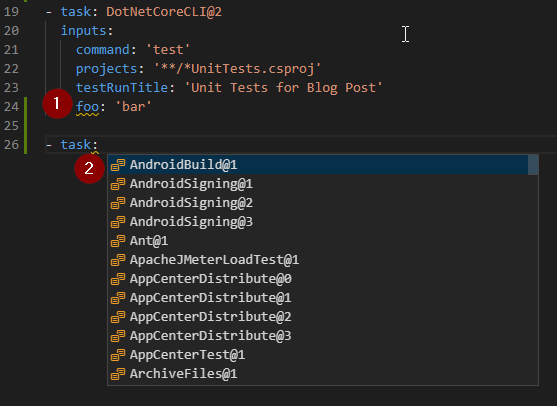
Visual Studio Code extension is a light-weight version of editing in the web portal. It underlines syntax errors (1) and has IntelliSense (2). Unfortunately, there aren’t configuration-settings like in the web portal. The developer has to know at least something about the syntax but luckily, IntelliSense helps. Just press “CTRL + .” and IntelliSense will come to help.
Converting Classic Pipeline to YAML Pipeline
It is relatively easy to convert a classic pipeline to YAML. Or get one step from the classic pipeline and convert it to YAML. In the classic pipeline, there is a “View YAML” button in a pipeline, and in each step, which will help with this. The simplified solution to convert the classic pipeline to YAML is the following:
- Create an empty YAML pipeline and
- Copy configuration from the classic pipeline.
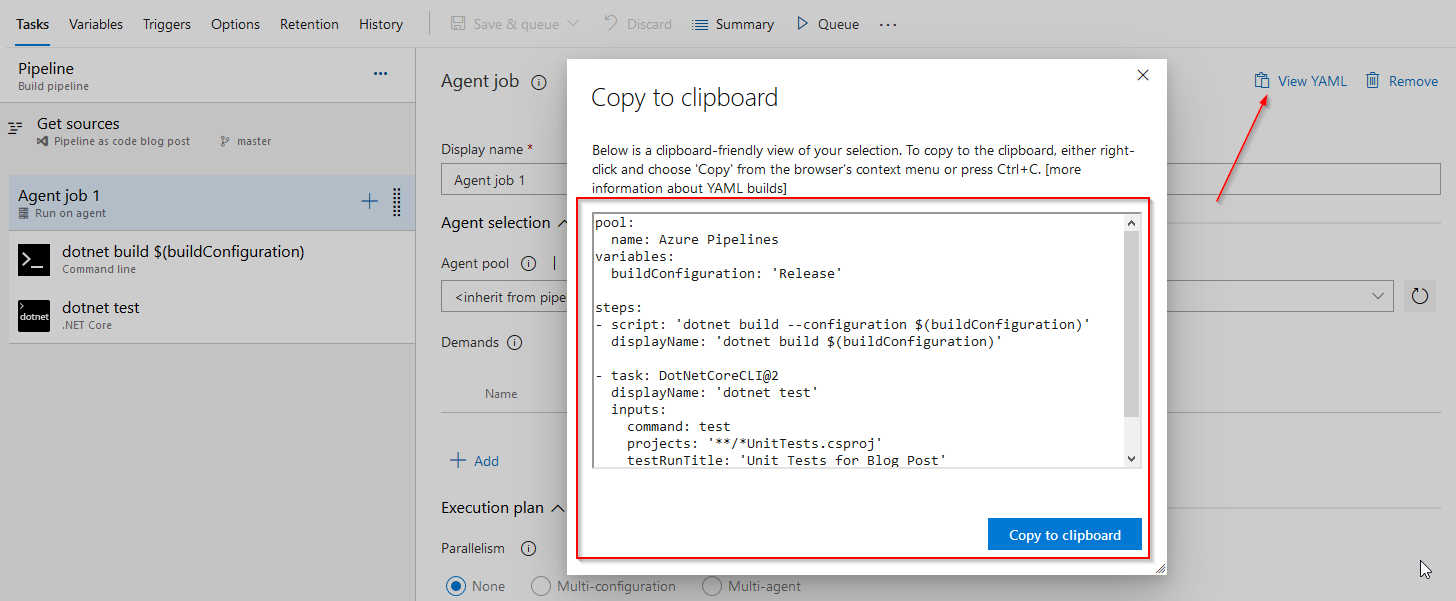
This is a really handy feature when converting pipelines or when learning YAML pipelines: we can get the YAML code from an old working classic pipeline with just two clicks.
Notice! All configurations aren’t in the converted YAML, and some parts have to be edited. For example, detailed pool information has to be changed to YAML.
Info: some changes and improvement is coming to “View YAML”: Replacing “View YAML”
Source: Converting Classic Azure DevOps Pipelines to YAML
Classic vs YAML Pipeline
Rule of thumb
For new pipelines, use YAML. For existing pipelines, keep classic (but consider converting to YAML).
The biggest pro for YAML pipelines is that they will be stored into version control. And thus important rule “keep everything in version control” can be achieved. That is a big lack of classic pipelines.
YAML pipelines support also better different versions of the pipeline. If we want to restore the older version of the code, the pipeline’s code will also be restored. But with classic pipelines, this doesn’t happen: we have to manually search for the version we need to restore. This is a big thing if the pipeline has changed significantly between versions.
Another good side with the version control is when making some changes to the pipeline with YAML, we can first make changes in a feature branch and test the pipeline there. And when we have tested the pipeline, we can merge it. This isn’t impossible with classic pipelines. But it is a more tricky task with classic pipelines as we have to put conditional steps that will run only with a given branch.
There is one pro for the classic pipeline. As it is graphical, it is easier to understand especially if we don’t use Azure Pipelines so often. For the same reason, there is a lower learning curve with classic pipelines than with YAML pipelines.
| Feature | YAML pipeline | Classic pipeline |
|---|---|---|
| Can be saved to version control | yes | no |
| Restore old version | yes, restored together with code | yes, but restored separately |
| Changes in isolation | yes, with branches | no |
| Graphical view | no (yes for settings) | yes |
| Easy to learn | no (but not too difficult either) | yes |
Conclusion
At first, YAML pipelines look difficult compared to classic pipelines. Some of us might doubt if it is too difficult to start using YAML pipelines. Fortunately, there isn’t a need to know everything by heart. There is some graphical help in the Azure DevOps web portal and IntelliSense will also help with the web portal and Visual Studio Code. If you are in doubt about YAML pipelines, I recommend to give them a chance. They can be the next upgrade for your pipelines and efficiency.
Further Reading
- Automatized Code Deployment from Azure DevOps to Databricks by Reinhard Seifert in Solita Data blog
- Use Azure Pipelines by Microsoft
- YAML schema reference by Microsoft