There are many CI/CD systems available. If you are using Github you have probably already tried Github Actions which are a great way to build and deploy your things, even though it’s still in its early days. If you work mainly in some cloud environment you probably have tried tools available on that specific environment. There is also good old Jenkins and many more.
However, this blog post is about Concourse CI. Concourse is an open-source continuous thing-doer like they have put it on their website. The most common way to run a Concourse binary is to use Docker, so let’s go on that path. I will show you how to create a simple pipeline with Concourse.
Before we’ll get further, it’s a good time for a disclaimer. Before you just start hacking, it’s good to read a little what Concourse is and what direction it’s heading in the future. A good place to start is their blog post about the roadmap towards v10. As you can see, there are many new features and concepts on the planning table, such as prototypes and projects. However, beyond technical details of some specific feature, it’s good to focus on the overall mindset behind it - it might be something else you’re used to. For example, they have ruled parametrized jobs out of their scope. Concourse is clearly not for everyone and every need. Also, Concourse is nothing new and fancy, it has been there since the year 2014.
Anyway, because you still be reading this, you probably think as I do - one cannot know if it’s good or not, without trying it. So, let’s get forward.
Basic concepts
Concourse pipelines are defined with YAML. Core concepts are resources, tasks and jobs. For every pipeline, there are inputs and outputs which are conceptually resource states with direction. Concourse itself doesn’t know any details about these. Resources are just some external sources with state and which you can interact by using get and put operations. Each resource has a resource type. If a resource is an abstraction for some project artifact, e.g. your codebase in git at a certain point in time, then resource type is an abstraction of git as a whole. However, from the implementation point of view resource type could also be seen as an abstraction of an actual implementation of how your pipeline interacts with some specific resource, e.g. your git repository.
But, this is computer science. Sometimes it feels like, the more vague some concept is, the more popular it is (you probably have heard of service-oriented architecture and can strictly define what is a service and what is not). Anyway, in the context of this blog post, we can just think that we have things where we get something (input) and things where we put something (output). These can be external things, or internal things to pass some result between tasks.
There are some Concourse core resources available which you can use without defining resource type explicitly and there are also some third-party resources listed on the Concourse website. In addition, there are also many others in the wild Internet.
However, keep security concerns in mind whenever you use third-party resource types and especially with the ones which are not listed on the Concourse website. Resource types are in practice just Docker images, so if you are unlucky you can find yourself pulling an image that is changed to something nasty without you knowing it. Fortunately, it’s quite an easy job to make your own resource type. So, if you feel like you don’t trust enough for the publisher of some resource type, you can use it as a base for your own resource type. However, remember to contribute to the base project if you make good improvements or bug fixes.
Let’s build and deploy some dummy docker images into the Docker Hub
I don’t go into details on how to start and run Concourse, but I have provided some instructions in my example project in Github. Also, a fully runnable pipeline example can be found from that project.
Every pipeline in Concourse has its main pipeline definition file. So, it’s good to start by creating one. In my case, it’s called concourse-example-pipeline.yml, but you can name it whatever you like. Because every pipeline has at least one input, let’s start with it.
- name: concourse-example
  type: git
  source:
    uri: ((git-source))
    branch: ((git-branch))
So, now we have our input. Its type is git, which is one of the core types of Concourse, so you don’t have to define explicitly its resource type in your definition. This syntax is quite easy to understand, it’s an abstraction of some git-branch in some repository. This example snippet doesn’t tell much about which branch and which repository we are using, though.
You can use the exact path to your repository in the pipeline definition if you wish, but I have used variables. My main goal has been to create a pipeline definition that is more like a template for a set of pipelines than just one pipeline for a specific use. In this way, you can easily create multiple pipelines from the same template and just provide different variables for each. This is especially useful if you wish to use it with artifacts that have common steps. One real-world example could be software with a microservice architecture pattern. With this approach, you have a shared pipeline definition for all of your services.
In my example, project variables are defined in files on local disk with a prefix runtime_variables.
git-source: https://github.com/solita-alperttiti/concourse-ci-example.git
git-branch: master
So, with these values my git resource is tied in a specific branch in a specific git repository.
Variables are loaded into the Concourse when the pipeline is created. It is also possible to define multiple configuration files if you wish to split them up.
Be noted, that variables can be loaded out from the Concourse afterward by using the Fly client with proper access, so in real-world cases it might be useful to consider using some credentials’ manager if you have some sensitive data in your variables. Concourse supports many different credential managers out-of-the-box. By using an external manager you only need to provide secrets required by the manager, when you are creating your pipeline. In general, when you are going to set up a new CI-system, you should always do a very careful evaluation from the security point of view. However, this is out of the scope of this blog post.
Right, now we have some input. The goal in this example is to get some input from git, make some things, and then push the result (or output) into a specific repository in Docker Hub. So, next we define the output. In general, the output can be whatever is needed, e.g. rsync your project artifacts to some server, push something to git and so on.
- name: concourse-example-registry
  type: registry-image-resource
  source:
    repository: ((docker-source))
    tag: ((docker-tag))
    username: ((docker-username))
    password: ((docker-password))
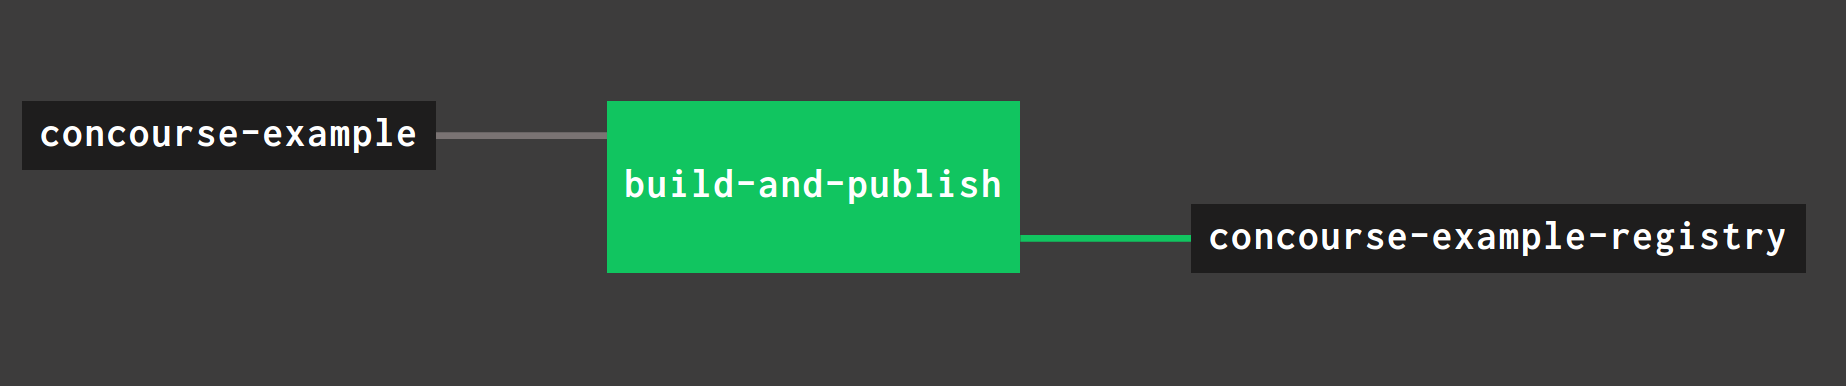
So, now we have external input and output. The next phase is to define a job that uses those. Let’s use our imagination and call our job build-and-publish. You could define as many jobs as you wish, but in this case, one is enough.
jobs:
- name: build-and-publish
Every job has some series of steps which is called a plan.
plan:
    - get: concourse-example
      trigger: ((trigger-build))
    - task: prepare-build
      file: concourse-example/concourse/pipelines/concourse-example/concourse-example-prepare-build.yml
      vars:
        docker-file: ((docker-file))
        docker-tag: ((docker-tag))
    - task: build
      file: concourse-example/concourse/pipelines/concourse-example/concourse-example-build.yml
      privileged: true
      params:
        DOCKERFILE: prebuild-output/((docker-file))
    - put: concourse-example-registry
      params: {
        image: image/image.tar
      }
So, while this definition is very self-explanatory let’s walk it through anyway. First, we fetch our input from git. Then we do some preliminary things before building our complex Docker image. Finally, we put the image into the Docker Hub. One point to note is the keyword trigger in our first get. This boolean value controls if the job should be triggered automatically when resource state changes (e.g. you push something into your repository).
I have divided my more complex tasks into separate files, so it’s easier to see a top-level flow from the main pipeline file. When creating separate task files, it’s important to understand, that only the main pipeline definition will be stored in system memory. Everything else, including separate task definition files, will be fetched from some external resource (e.g. git in our case). This means that when you are about to update your tasks, you have to push those into an external resource to changes take an effect.
For every task, we can also define a different running environment.
image_resource:
  type: registry-image
  source:
    repository: ubuntu
    tag: "bionic"
Also tasks can have their own inputs and outputs. These are basically directories to pass by in your pipeline. In my example, I make minor append into Dockerfile, based on pipeline variables, and then pass it on to the actual build task.
Beyond inputs and outputs, there are also caches available in Concourse.
caches:
  - path: image-cache
Caches are used to preserve the partial state of your tasks’ running environment between builds. Many times this is a useful feature in your tasks, e.g. Concourse doesn’t need to download every dependency on every build.
Summary
I have tried to keep my example project for this blog post as simple as possible, but although a such level it can provide some useful tips on the first steps with Concourse.
Concourse has some rough edges, that fact cannot be bypassed. It’s also good to understand, that it’s not suitable for every need. It’s definitely not a swiss-knife. Also, some flexibility in your mindset might be needed if you don’t already share the same ideas with authors. There is also probably a steep learning curve if you are just fine with e.g Jenkins.
Anyway, it’s good we have alternatives and especially ones which are FOSS. I myself have used the Concourse in a couple of projects. There have been some hard moments, but overall I have kind of liked it. However, I’m not here to tell which tool is the best but just trying to provide help on the first steps if you are interested to get familiar with Concourse. It’s up to you to decide what suits best for your needs. I hope this blog post has provided some good insights for you.
Feel free to share your thoughts and let me know if you think my approach has some flaws. Every feedback is appreciated. Remember to check out the code behind this blog post at GitHub.