Having a simple way for creating and launching test instances for feature branches can be a real timesaver for developers and testers. A test instance in our case is an isolated bare-bones Linux virtual machine containing only the necessary dependencies, services and data required to run your built application. The instance just receives build artifacts and test data related to the feature branch and starts the app automatically.
In our NAPOTE project we can launch isolated test instances from GitHub pull requests by using custom Slack commands and GitHub API. Running instances are also automatically terminated at the end of each day, so no manual work other than starting a new instance is required. Furthermore, money is saved because there will be no idle instances running 24/7.

As a warm up, read the related blog post here: http://dev.solita.fi/2017/04/12/easy-test-deployments.html
We are basing our implementation on the previously mentioned blog post, using slightly different environments and adding some nice enhancements, such as GitHub API integration for querying branches and pull requests.
This post will go through all the steps required to build a system like we are using in our project.
Being an AWS newbie, this was a nice way for me to learn more about the fundamental AWS services and how to make them interact with each other. In this walkthrough we’ll use AWS Management Console. It is fine for creating a somewhat simple system like this, but for more complex setups I would recommend using AWS CLI and other tools such as AWS CloudFormation.
Requirements and architecture
The list of requirements may be baffling, but don’t worry, you don’t have to have very deep understanding of these areas. AWS has a very comprehensive documentation of every service they provide.
- If you are up to it, get a separate AWS environment or an AWS user to not mess up your main production AWS environment while you are playing around.
- CircleCI, Jenkins or other automatic build environment.
- Slack account and permission to create Slack Apps.
- Some basic knowledge of AWS S3, AWS Lambda, AWS EC2, AWS AMIs, AWS API Gateway, AWS Cloud Watch, managing AWS user permissions with security groups, roles and custom policies, Cloud Init basics.
- Python 2.7 basics.
- GitHub API basics.
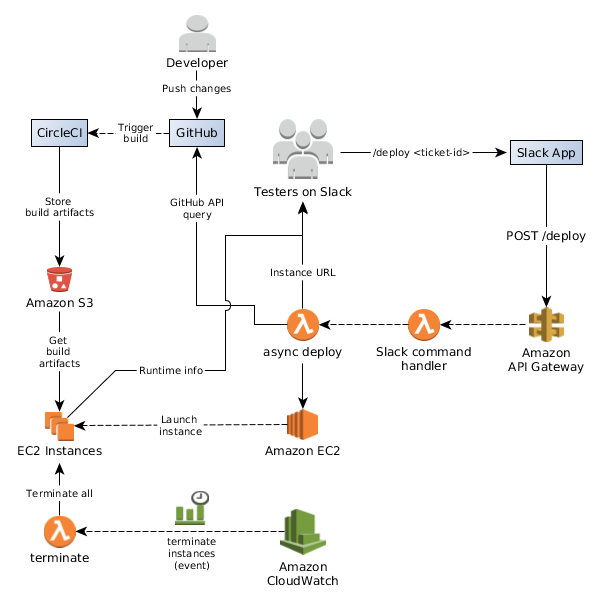
Here is a diagram depicting the basic architecture of our system:
Setup automatic builds per branch (for CircleCI)
Refer to: .circleci
We are using CircleCI for building and testing our feature branches and Jenkins for running our staging and production builds. The main idea is to create a new build for each commit pushed in a feature branch and send the build artifacts to some easily accessible storage, such as AWS S3 for later use.
In short, you could:
- Create an own S3 bucket for your build artifacts.
- Create a separate circle-ci AWS user in IAM and config user security.
-
Allow circle-ci user only to push new artifacts into a predefined bucket. You can use a security policy, such as:
{
  "Version": "2012-10-17",
  "Statement": [
    {
      "Effect": "Allow",
      "Action": [
        "s3:PutObject"
      ],
      "Resource": [
        "arn:aws:s3:::napote-circleci/build-artifacts/*"
      ]
    }
  ]
}
This allows CircleCI AWS user to PUT new artifacts only into build-artifacts directory in napote-circleci bucket.
-
-
Configure a build and S3 deploy task The following snippet is from: config.yml
- run:
  name: Deploy build artifacts
  command: |
    mkdir deploy
    ln ote/config.edn deploy/ote-${CIRCLE_BRANCH}-config.edn
    ln /tmp/ote/ote.jar deploy/ote-${CIRCLE_BRANCH}.jar
    pg_dump -h localhost -p 5432 -U postgres -Z 1 napote > deploy/ote-${CIRCLE_BRANCH}-pgdump.gz
    aws s3 cp deploy s3://napote-circleci/build-artifacts --recursive
If using S3, storing build artifacts is quite straightforward. We are using the AWS CLI in the container. Notice that we are also making a DB dump as a one build artifact. It includes some essential data and additional data for testing purposes. You might want to do something similar in your implementation.
We have created a CircleCI docker image that include all the dependencies needed for our build tasks. You can check it out at here.
Final touches You might want to add a Lifecycle rule for your build-artifacts directory to remove old build artifacts from your bucket. This can be easily done by navigating into your S3 bucket in the Amazon S3 dashboard, and then choosing the “Management”-tab. Here you can add a Lifecycle-rule. The Expiration-setting manages when objects are deleted from your S3-bucket.
Create a custom Slack App
Go to: https://api.slack.com/apps
- Create a New App
- Name the app and define workspace
- Activate Incoming Webhooks
- Copy the Webhook URL Warning: Keep this URL secret!
- Add these Slash Commands
- /deploy
- /terminate You can leave “Request Url” blank for now. We’ll come back after our AWS API Gateway has been configured.
- Copy Verification Token from Basic Information page. Warning: Keep this Token secret!
Verification token is needed to verify that messages received by our Lambda functions are coming from our Slack App.
Setup your AWS environment
It is better to get an isolated AWS environment or a limited AWS user for this setup, so you don’t accidentally mess up your main deployment environment. This is going to be a separated sandbox for your investigative testing needs.
Lambda
We are using AWS Lambda for handling incoming queries from our Slack Slash commands and triggering actions on AWS.
Go to your Lambda Dashboard.
We are going to create three Lambda functions that will handle queries from Slack, trigger the deployment process and terminate running EC2 instances periodically, so we don’t have to terminate them manually.
Lambda Script 1: Slack slash command handler
First, go to the Functions view and click “Create function” and “Author from scratch”.
Name your function and select Python 2.7 Runtime.
In the Role section, click “Create a custom role”. We will use this same role for each of our Lambda function for convenience.
Setup Lambda user role and security
Now you should be in the AWS role creation page.
For “IAM Role”, select “Create a new IAM Role”. Let’s name the role, for example deploy_branch.
Now, open and edit View Policy Document. Copy-paste the following policy snippet in the editor box.
{
    "Version": "2012-10-17",
    "Statement": [
        {
          "Effect": "Allow",
          "Action": [
            "logs:CreateLogGroup",
            "logs:CreateLogStream",
            "logs:PutLogEvents"
          ],
          "Resource": "arn:aws:logs:*:*:*"
        },
        {
            "Effect": "Allow",
            "Action": [
                "lambda:InvokeFunction"
            ],
            "Resource": [
                "*"
            ]
        },
        {
            "Effect": "Allow",
            "Action": [
                "ec2:Start*",
                "ec2:Stop*",
                "ec2:RunInstances",
                "ec2:DescribeInstances",
                "ec2:TerminateInstances"
            ],
            "Resource": "*"
        }
    ]
}
These policy settings allow our Lambda functions to log events, invoke other Lambda functions, and control our EC2 instances. These policies are active for all resources for convenience. But, if you like, you can limit the affected resources by changing the value of the “Resource” key.
Finally, click “Allow”.
We can reuse this role with the other Lambda functions we create later.
Let’s add some code!
Click, “Create function”. In the Create function page, you can choose Existing role we just created.
Copy the following code into the Function code editor and save it.
# coding=utf-8
import os
import boto3
import urlparse

"""
Required Lambda Environment Variables:
- slacktoken: Your private Slack App Verification Token
- allowed_users: List of Slack user_ids id1,id2,...
"""

def deploy(branch, response_url):
    lam = boto3.client('lambda', region_name='eu-central-1')
    lam.invoke(FunctionName='deploy_async',
               InvocationType='Event',
               Payload=b'{"branch": "' + branch + '", "response_url": "' + response_url + '"}')

def terminate_instances(response_url):
    lam = boto3.client('lambda', region_name='eu-central-1') # Use the correct region here
    lam.invoke(FunctionName='terminate_instances',
               InvocationType='Event')

def lambda_handler(event, context):
    token = os.environ['slacktoken']

    # We assume that API Gateway has mapped the urlencoded data from slack into event['body'], so we can parse it using urlparse.
    data = dict(urlparse.parse_qsl(event['body']))

    # The user_name field is being phased out from Slack. Always identify users by the combination of their user_id and team_id.
    user_id = data.get('user_id', None)
    allowed = os.environ['allowed_users'].split(',')

    if not user_id in allowed:
        return {'text': 'You are not on the allowed user list.', 'response_type': 'ephemeral'}
    else:
        try:
            if data.get('token') == token:
                if data['command'] == '/deploy':
                    deploy(data.get('text', ''), data['response_url'])

                    return {'text': 'Searching branch with a query: ' + data.get('text', '') + '. Please wait...',
                            'response_type': 'ephemeral'}
                elif data['command'] == '/terminate':
                    terminate_instances(data['response_url'])

                    return {'text': 'Terminating running EC2 instances. Please wait...', 'response_type': 'ephemeral'}
                else:
                    return {'text': 'Error: Unknown command', 'response_type': 'ephemeral'}
        except Exception, e:
            return "error: " + str(e)
Notice, that we need to provide slacktoken and allowed_users environment variables for the lambda.
def lambda_handler(event, context):
    token = os.environ['slacktoken']

    ...

    allowed = os.environ['allowed_users'].split(',')

    ...
You can add them in the “Environment Variables” section.
Use the Slack “Verification Token” value for slacktoken env variable.
For the allowed_users variable, get your slack user id and paste it there.
We trigger our deploy Lambda function using boto3 client:
...

def deploy(branch, response_url):
    lam = boto3.client('lambda', region_name='eu-central-1')
    lam.invoke(FunctionName='deploy_async',
               InvocationType='Event',
               Payload=b'{"branch": "' + branch + '", "response_url": "' + response_url + '"}')

    ...
Settings
You might want to increase the function timeout value to one minute or so.
Lambda Script 2: Async deploy
Create a new function as described above. You can now reuse the previously created role in the “Existing role”-selection.
Let’s add some code
Copy the following code into the Function code editor and save it.
# coding=utf-8
import os
import boto3
import urllib2
import time
import ssl
import json
import string
import re

## Cloud-init config. This will be sent through boto3 as UserData to our EC2 Centos instance
## Note that you'll have to add your own specific commands here. Most relevant commands are left here as an example.
initscript = '''#cloud-config
runcmd:
  - cd /home/centos/
  - sudo wget https://s3.eu-central-1.amazonaws.com/napote-circleci/build-artifacts/ote-$BRANCH-pgdump.gz;
  - sudo wget https://s3.eu-central-1.amazonaws.com/napote-circleci/build-artifacts/ote-$BRANCH.jar;
  - sudo wget https://s3.eu-central-1.amazonaws.com/napote-circleci/build-artifacts/ote-$BRANCH-config.edn;
  - ./start-ote.sh $BRANCH $RESPONSE_URL
'''

def send_slack_msg(msg, response_url):
    try:
        payload = '{"text": "' + msg + '", "response_type": "ephemeral"}'
        urllib2.urlopen(response_url, payload)
    except Exception, e:
        print 'error sending Slack response: ' + str(e)

def find_pr(query):
    # Fill in your GitHub repo details
    req = urllib2.Request('https://api.github.com/search/issues?q=repo:<github-username>/<repo-name>+type:pr+' + query)

    try:
        res = urllib2.urlopen(req)

        if res.getcode() == 200:
            data = json.load(res)
            return data["items"]
    except:
        pass

    return []

def get_branch_ref(branch):
    return branch["head"]["ref"]

def get_branch_data(pull_request):
    req = urllib2.Request(pull_request["pull_request"]["url"])

    try:
        res = urllib2.urlopen(req)

        if res.getcode() == 200:
            data = json.load(res)
            return data
    except:
        pass

    return False

def check_build_artifacts(branch_ref):
    # Fill in path to your build artifact e.g. https://s3.eu-central-1.amazonaws.com/napote-circleci/build-artifacts/ote-somebranch.jar
    req = urllib2.Request('https://<your_s3_bucket_path>/ote-' + branch_ref + '.jar')
    req.get_method = lambda: 'HEAD'

    try:
        res = urllib2.urlopen(req)
        if res.getcode() == 200:
            return True
    except:
        pass
    return False

def deploy(branch_ref, response_url):
    script = initscript.replace('$BRANCH', branch_ref)
    script = script.replace('$RESPONSE_URL', response_url)
    ec2 = boto3.client('ec2', region_name='eu-central-1')  # Use the correct region here

    try:
        res = ec2.run_instances(ImageId='<your-ami-image-id>',
                                InstanceType='t2.medium',
                                UserData=script,
                                KeyName='<your-ec2-keypair-name>',
                                MinCount=1,
                                MaxCount=1)
    except Exception, e:
        msg = e.response['Error']['Message'] or str(e)
        print msg
        raise Exception(msg)

    id = res['Instances'][0]['InstanceId']
    host = None

    while host is None:
        time.sleep(2)
        instances = ec2.describe_instances(InstanceIds=[id])

        for r in instances['Reservations']:
            for i in r['Instances']:
                dns = i['PublicDnsName']
                if dns != '':
                    host = dns
    return host

def start_instance(branch_ref, response_url):
    host = deploy(branch_ref, response_url)
    url = 'http://' + host + '/'

    return url

#### Lambda handler ####
def lambda_handler(event, context):
    # Replace spaces with +, to allow raw github search api queries
    query = event['branch'].replace(' ', '+')

    # Allow raw github search API queries, otherwise search branches by default
    if query.startswith('raw:'):
        query = re.sub(r'^raw:', '', query)
    else:
        # Find branch by ticket id or name. If ticked id is used, remove the hash symbol.
        query = 'head:' + re.sub(r'^#', '', query)

    pull_reqs = find_pr(query)
    pr_titles = [x["title"] for x in pull_reqs]

    if len(pull_reqs) == 1:
        branch = get_branch_data(pull_reqs[0])
        branch_ref = get_branch_ref(branch)

        if check_build_artifacts(branch_ref):
            send_slack_msg('Starting an EC2 instance for branch: ' + branch_ref + '... This might take a while.', event['response_url'])

            try:
                # Note: Instance will send a Slack message when the app server is up and running.
                url = start_instance(branch_ref, event['response_url'])
                txt = 'Started instance for a branch: ' + branch_ref + ': ' + url + '\nInitializing... Please, wait.'
            except Exception, e:
                txt = 'Failed to start the instance: ' + str(e)
        else:
            txt = 'No CircleCI build data found from S3 for branch: ' + branch_ref + '. Check that the build has been successful!'
    elif len(pull_reqs) > 1:
        txt = 'Found multiple PRs from repo, pick one:\n' + string.join(pr_titles, '\n')
    else:
        txt = 'No PRs found with: ' + query

    send_slack_msg(txt, event['response_url'])
A word about Cloud Init
Our EC2 instance supports cloud-init. The cloud-init configuration script is in YML format. We can pass the configuration as “UserData” string to our EC2 instance using the boto3 client.Cloud-init allows us to control our EC2 instance similarly as one would control e.g. CircleCI build tasks. This level of control also facilitatesthe update process of the instance; we do not have to create a new AMI version each time we want to add some small update to the deployment steps, such as starting or stopping some services running in the instance.
A brief introduction to GitHub API
We are using the open GitHub REST API for searching branches related to pull requests in our GitHub repository. This way, Slack users do not have to remember the exact branch name to trigger the deployment process. Partial name or ticket ID is enough. If no unique result is found, the Slack user receives a list of matching branches. Unique branch query is required for the deployment to proceed.
Currently, we are utilizing the anonymous version of the GitHub API. One can send 60 queries per hour anonymously. This is more than enough for our development team. In case you need to increase your query limit, you can register for an API key, and send up to 5000 queries per hour.
Settings
Add a longer timeout for this function, about 5 minutes would be good. It might take some time for EC2 to boot up our instance (1-10 min), and we do not want to allow our Lambda function to timeout and restart.
Lambda Script 3: Periodic EC2 instance terminator
Create a new function as described above. You can now reuse the previously created role in the “Existing role”-selection.
Let’s add some code
Copy the following code into the Function code editor and save it.
# coding=utf-8
import os
import boto3
import urllib2

"""
Required Lambda Environment Variables:
- slack_webhook
"""

def send_slack_msg(msg):
    try:
        payload = '{"text": "' + msg + '", "response_type": "ephemeral"}'
        urllib2.urlopen(os.environ['slack_webhook'], payload)
    except Exception, e:
        print 'error sending Slack msg: ' + str(e)


### Lambda handler ###
def lambda_handler(event, context):
    ec2 = boto3.client('ec2', region_name='eu-central-1')  # Use the correct region here
    instances = ec2.describe_instances()
    ids = []

    for r in instances['Reservations']:
        for i in r['Instances']:
            ids.append(i['InstanceId'])

    ec2.terminate_instances(InstanceIds=ids)

    if len(ids) > 0:
        send_slack_msg('Terminated running instances!')

    return 'Terminated instances: ' + str(ids)
As you can see, this is our least complex function. We simply get the IDs of our EC2 instances and terminate any running
or stopped instances. Ideally, we would like this function to run every evening after work, so we do not have to worry about shutting down
the instances manually. You can also create another Slack Slash command, as is done in the slack_deployhook function, that
you can use for terminating instances manually.
Define the slack_webhook environment variable. This is the Webhook URL of your Slack App.
CloudWatch cron trigger
We want to terminate all the instances at 19:00 GMT+2 every day after work hours.
In the function editor, at the “Add triggers”-menu, click “CloudWatch Events”. Then, select “Create a new rule” and name it.
For “Rule type”, select Schedule expression and add cron(0 17 * * ? *).
This defines an event that triggers each day at 17:00 UTC.
Finally, click “Add”.
Settings Add a longer timeout for this function, about 1 minute should be fine.
API Gateway
Here, we’ll create a custom API using API Gateway. This API will be our endpoint for Slack to send queries. It will also
trigger our slack_deployhook Lambda function. To start, go to the API Gateway dashboard. Now, let’s get in the business!
- In the menu click APIs and then “Create API”.
- Name your API and click “Create API” in the bottom corner. Don’t worry about the Endpoint Type.
- Click Resources -> Actions and choose “Create Resource”
- Name your resource to e.g.
deployand click “Create Resource” in the bottom corner. - Now, click your newly created
/deployresource and choose Actions -> “Create Method”. Finally, select POST and click the tick-button.
We have created an API endpoint that will be used by our Slack slash commands. Let’s trigger our slack_deployhook
function with this endpoint.
- In /deploy - POST - Setup, select
Lambda Function"as Integration type. - For Lambda Region, select whatever region you used when you created your Lambda functions.
- Write your function name,
slack_deployhook, in the Lambda Function textfield and Save.
Slack sends all POST request in x-www-form-urlencoded form. We have to convert those into JSON, so we can pass them to our Lambda function. For this, we’ll have to create a Body Mapping Template.
- Click /deploy -> Post.
- In /deploy - POST - Method Execution view, click “Integration Request”.
- In “Body Mapping Templates”, click “Never” for “Request body passthrough” setting.
- Then, click “+ Add mapping template”.
- Write “application/x-www-form-urlencoded” in the Content-Type section and click the tick-button.
- Now, click the “application/x-www-form-urlencoded”-link and copy the snippet below into the opening text area and save.
Template for converting Slack request body from x-www-form-urlencoded to json:
{
  "body" : "$input.body"
}
Our Slack lambda function will receive an event with urlencoded data in the "body" attribute. This can be easily parsed with python code and converted into a dict.
The final phase of API creation is to deploy it. After deploying, we get a public URL for our API.
- Click Actions -> Deploy API.
- In Deploy API dialog, select “prod” and click Deploy.
- Now you should be redirected in the Stages-view. Copy the “Invoke URL”. This is the base URL of our API and it is
something like: https://
.execute-api. .amazonaws.com/prod/ - In Stages-view, click “prod” -> / -> /deploy -> POST and copy the “Invoke URL”. We’ll need this for our Slack App.
Final touches
Go to your Slack APP and edit your Slash Commands. Copy the URL above into the “Request URL” textfields.
More info: AWS forum thread Amazon API Gateway - Mapping Template Reference
EC2 Instances
Phew, we have come a long way. We have set up CircleCI builds, created a custom Slack App, configured an API Gateway and created a bunch of Lambda functions.
Here, have a kitten as a reward:
 Photo by Ihsan Aditya
Only one step left, which is creating your own EC2 image. We are using Amazon Elastic Compute Cloud, because it is very straighforward for launching and controlling new instances.
Each time a deploy hook lambda function triggers, we want to boot up a fresh EC2 instance with all required dependencies installed.
To begin, go to your EC2 Dashbord page.
1. Create an SSH key pair
First, we’ll have to create an SSH key pair. It will be used to connect to our launched instance in a secure manner.
- In Network & Security menu, click “Key Pairs”.
- Click “Create Key Pair” and name it. Click Create, and wait for download dialog.
- Notice, that this is the only moment that you can download the .pem file required for ssh connection. Download the file and store it in a secure place. Never add it in a public repository! If you failed to download the file, delete the key pair and create a new one.
2. Launch a Centos 7 Instance
We are using a Centos 7 based image in our project. Let’s launch a bare-bones Centos 7 instance that we are going to use as a base for our AMI.
- In Instances-menu, click “Instances”. Click, Launch Instance.
- You should now be in Instance Wizard page.
- In Step 1, click AWS Marketplace and search for CentOS 7. Find CentOS 7 (x86_64) - with Updates HVM and click Select-button.
- In the opening dialog click Continue.
- Leave all the settings to default values and click “Review and Launch”.
- In the opening dialog, select the key pair we created above, and Launch Instances.
3. Setup and configure your instance
Now we can connect to our running instance via SSH. You can connect to the instance by selecting the running instance in the Instances-view and by clicking Connect-button. Read the instructions in the opening dialog.
Install the dependencies and services you need for your built app. You can look for examples at here
4. Create a new Amazon Machine Image (AMI) based on the instance
Now that you have installed all the stuff needed in the instance, it is time to freeze it and create a new AMI.
- In the Instances page, select your running instance and then click Actions -> Image -> Create Image.
- Name and describe your image, and click “Create Image”.
- The image creation process will start and it will take a while, so you might want to grab a cup coffee.
- You can track the image status in Images-> AMIs view.
- Copy the AMI ID.
Setup network security
By default, we are launching each new instance in the “default” network security group. For convenience, we will edit the default group instead of creating a new one.
- Click Network & Security -> Security Groups.
- Find and select the “default”-group.
- Open Inboud-tab, and add the following rules, and click Save:
- Type: HTTP, Source: Custom 0.0.0.0/0
- Type: SSH, Source: Custom 0.0.0.0/0
These rules allow us to connect to the running instance via SSH if debugging is needed. Also, we’ll have to allow access to port 80 to serve the deployed app. You might have to open a different port for your app.
Final touches
Edit your deploy_async Lambda function and paste your AMI ID and Key pair name in the proper places here:
...

res = ec2.run_instances(ImageId='<your-ami-image-id>',
                                InstanceType='t2.medium',
                                UserData=script,
                                KeyName='<your-ec2-keypair-name>',
                                MinCount=1,
                                MaxCount=1)
...
Conclusion
Providing simple tools that your whole team can use without technical expertise can be worth the effort. For our team, this tool has made our exploratory testing process more efficient and we’ve been able to catch some nasty bugs before merging them in our master branch.
I hope you learned something new from this post and got some inspiration for creating your own AWS based setup.
Find out more at our project GitHub repository: mmtis-national-access-point